Psoas Release: This Little-Known Muscle Can Cause Pain

Experts In This Article
- Jill Miller, C-IAYT, ERYT, YACEP, founder of Tune Up Fitness and author of Body by Breath and The Roll Model
- Lawrence Van Lingen, structural integration specialist and founder of InneRunner
- Sarah Crawford, PT, DPT, COMT, CMTPT, physical therapist and founder of Anchor Wellness Center and WAVE Physical Therapy
29029 Everesting is an endurance event where you climb 29,029 feet—the equivalent height of Mt. Everest—in three days. It takes place in six different cities from June to September. My husband and I picked Snowbasin, Utah. To reach that magic 29,029 number and finish the event, we needed to hike 2.3 miles up, take the gondola down, and repeat 13 times for an elevation gain of 2,310 feet per ascent. That’s approximately 30 miles in 36 hours, and it’s you versus you.
On ascent three, my right hip flexor started to tighten like a twisted rope, making it difficult to flex my hip and pick up my leg on the steepest parts of the trail. Luckily, the event had an onsite recovery room with licensed therapists and massage tables, compression boots, foam rollers, and massage guns with various attachments.
Given my nagging discomfort, I took a quick break to try and release my hip flexor tension with a massage gun and a layer of Tiger Balm. Feeling slight relief, I hiked up two more times. But after ascent five, I felt like I was dragging a bag of rocks tied to my right ankle while stabbing my tendon with a screwdriver.
It was nearly impossible to bend my leg—limiting my hiking power and slowing me down. My early 90-minute ascents stretched to 2-plus hours, and I still had 8 more climbs to go.
Disheartened (and worried that I might DNF), I returned to the recovery room and met with one of the therapists to seek relief. When I couldn’t lift my leg into flex without using my hands as support or extend it without pain, the therapist paused.
“I think it’s your psoas,” he said.
“My what?” I asked.
The muscle he introduced me to—a muscle most people haven’t heard of—turned out to be the source of my problem.
What is the psoas?
Often overlooked, the psoas (so-as) is a centrally located hidden workhorse of the body. It’s a long, tenderloin-shaped stabilizer muscle that lies deep in your core. You have two of them, one on each side of the vertebral column in the lumbar region of your back. It connects the middle (thoracic) and lower (lumbar) parts of your spine and travels down through your pelvis. There, it blends with another muscle (the iliacus) across your hip joint and attaches to the top of your thigh bone.
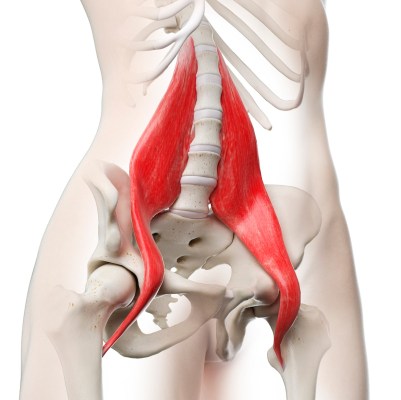
Because of its orientation and connection to the upper and lower spine, the psoas works in conjunction with the 36 muscles of your pelvis, your other core muscles, and diaphragm—playing a starring role in the movement and functionality of your lower back, pelvis, and hips.
The main job of the psoas is to flex and rotate the hips when bringing your legs forward or toward your chest (how your legs move when walking or running), assist in side-bending and rotating the lumbar spine, and stabilize the pelvis and spine when you walk or stand.
The psoas is also threaded to your diaphragm, making it an essential partner to how you breathe.
“A breathing spine is a healthy spine. As we breathe in, the psoas should act as giant bellows to assist air movement,” explains structural integration specialist and founder of InneRunner, Lawrence Van Lingen. “The back arches and the chest and belly expand, the diaphragm flattens and drops down, lengthening the psoas (the upper fibers may contract to assist the diaphragm). As we breathe out, it helps flex or round the spine, and the diaphragm relaxes upwards into a dome.”
Holistic health practitioners refer to the psoas as the “muscle of the soul.” It’s believed that the psoas is the keeper of our trauma and stress, reflecting our emotional and physical states.
You may hear holistic health practitioners refer to the psoas as the “muscle of the soul.” It’s believed that the psoas is also the keeper of our trauma and stress, reflecting our emotional and physical states.
“Our breathing patterns are often out of sync from too much sitting, emotional or physical trauma, poor movement, and excessive bracing of the core. This creates tension in the psoas and the body,” Van Lingen explains.
Symptoms of a tight psoas
Sarah Crawford, PT, DPT, COMT, CMTPT, founder of Anchor Wellness Center and WAVE Physical Therapy explains some common indicators of psoas dysfunction. They include:
- low back pain
- tightness or pain in the front of the hip or groin
- limited range of motion in hip extension
- pain radiating down the leg
However, none of these symptoms are exclusive to a tight psoas, so she recommends an evaluation by a musculoskeletal specialist.
Other signs of a tense and unhappy psoas can include changes in your posture and pelvic tilt, creating movement compensations elsewhere in your body.
How to release the psoas
Directly accessing the psoas can be difficult (and possibly painful) if you’re not careful. Depending on the severity of your discomfort, you may want to work with a trained and licensed massage or physical therapist to find relief—especially if it’s chronic.
When the therapist worked on me, it was like kneading tough dough. He pressed, dug, massaged, stretched, and flexed my psoas, hip flexor, and supporting muscles until the tension and pain eased—a technique I couldn’t have done on my own.
But movement practitioners and physical therapists have different and preferred approaches to restoring balance in the body and easing psoas tension. Many of these you can incorporate into your own mobility routine.
Supported bridge
Crawford teaches her clients the benefits of performing a supported bridge using a yoga block placed under your sacrum, the flat part between your lower back and tailbone. This allows the psoas to be in a slack position. “Combined with diaphragmatic breathing, this exercise re-educates the nervous system that this muscle doesn’t need to be on guard,” she says.
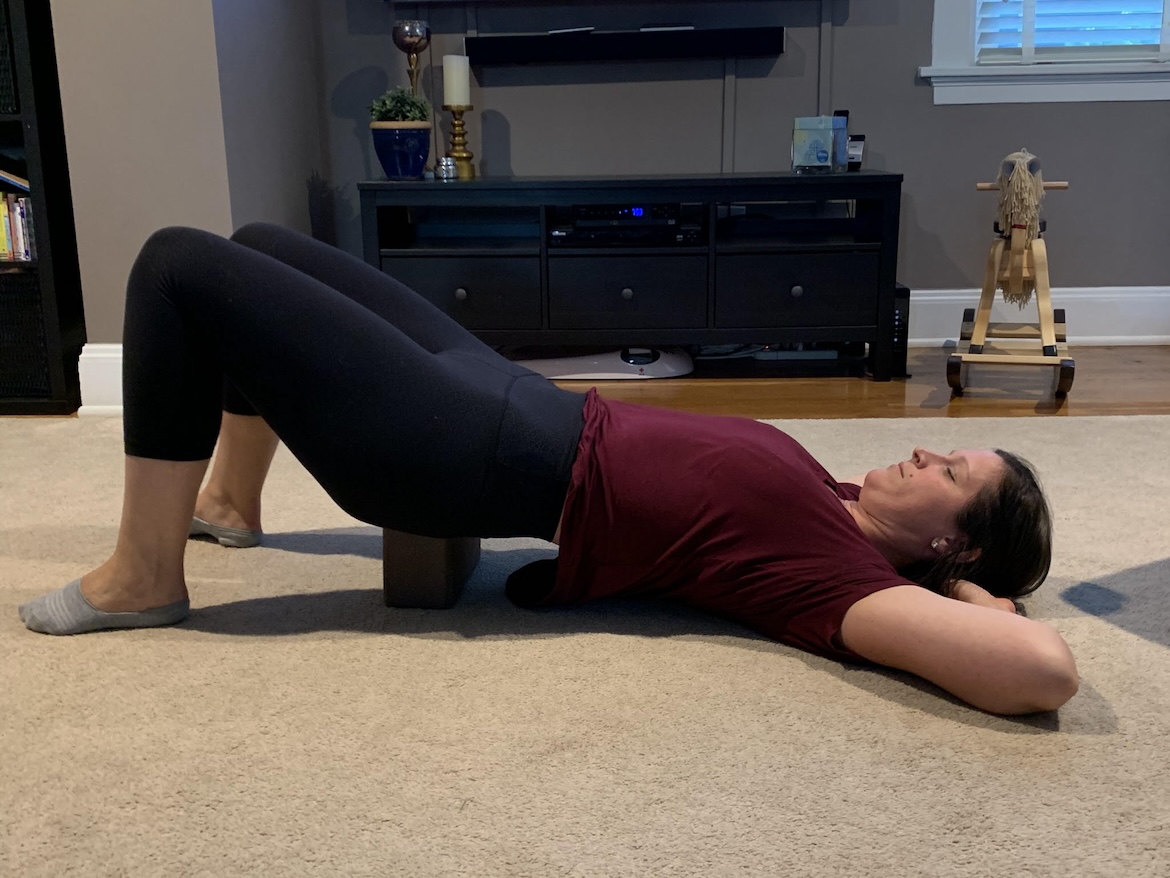
- Lie on your back on the floor or on a mat, and place your hands behind your head.
- Bend your knees and place your feet flat on the floor, hip-width apart, ensuring they are close enough for your fingertips to touch your heels lightly when you extend your arms fully.
- Press firmly into your feet and arms to create a stable base.
- Engage your core muscles and lift your hips toward the ceiling, forming a straight line with your body from shoulders to knees. Keep your thighs and feet parallel to prevent any inward or outward movement.
- Slide a yoga block under your sacrum, the flat part between your lower back and tailbone.
- Relax your neck engage in deep breathing to help release the psoas.
- Stay here for 5 minutes.
Depending on your activity level and circumstances, Crawford recommends doing the supported bridge once or twice a day, five days a week, for five minutes.
Using tools
If you’re performing self-treatment psoas release exercises, it’s important to know that the psoas lies behind major abdominal organs, including the uterus and ovaries. Understanding what you’re pressing on is vital to not irritating or damaging nerves, organs, arteries, or fascia layers.
Jill Miller, C-IAYT, ERYT, YACEP, founder of Tune Up Fitness and author of the bestselling books Body by Breath and The Roll Model prefers softer accessories over hard tools (like the hip hook), which can cause damage to these fascial layers of the abdomen when not used properly.
One of her tools is the Coregeous therapy ball, sometimes called a belly ball. Slightly larger than a grapefruit, it inflates to a moderately firm yet soft and squishy round ball for gently targeting and massaging the psoas and other deep abdominal muscles with an open palm feel.
Front abdominal psoas release
Specifically targeting the psoas, the front abdominal release is a popular rolling technique—best performed on an empty stomach.
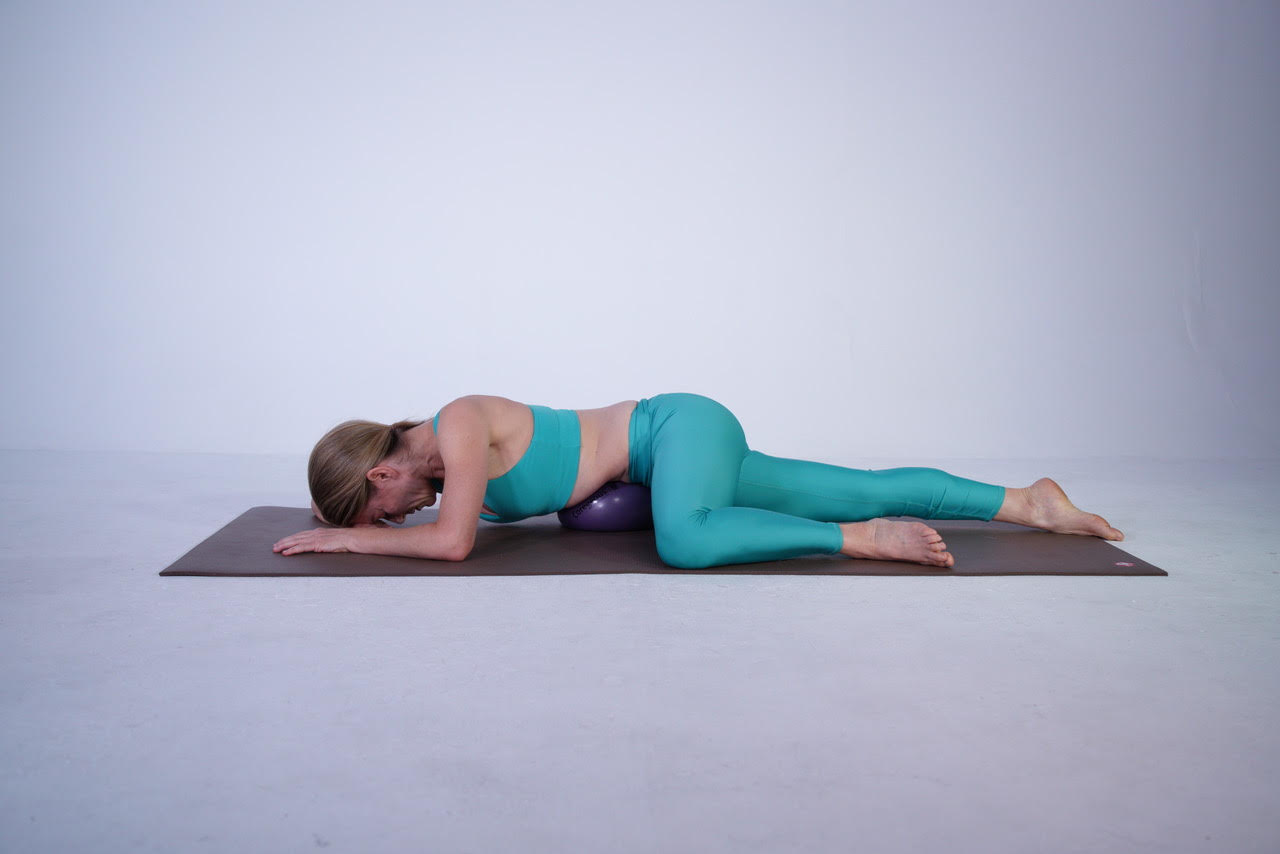
- Lie face down with the ball (or rolled-up mat or towel) under your abdomen.
- Start with the prop on the side of your abdomen to the left or right of your navel. This allows you to adjust to any tender areas. As you acclimate to the pressure, you can start to move the ball directly to the front of your belly, paying attention to anything that feels uncomfortable or pulsing. If you feel pulsing, move off that spot.
- Inhale and hold your breath while contracting the muscles on the prop. Hold for 3 to 5 seconds, then exhale. Repeat the contraction and relax your breath. Repeat 10 times.
- Slowly move the ball or towel from side to side across your belly while breathing and without tension for 1 to 2 minutes.
- Pivot your body around the prop to create a winding motion on both sides and breathe deeply. Do this for 2 to 4 minutes.
Breathwork
Working on your breath and diaphragm expansion may not seem like the most exciting practice, but if your psoas and hips are tight, you may want to incorporate breathwork into your daily routine. (This video from Tune Up Fitness demonstrates a technique called the diaphragm vacuum for releasing tension.)
How to prevent psoas pain
Incorporating proper stretching, breath, massage, and rolling practices into your mobility and fitness routines are just some of the ways to maintain a happy and healthy psoas. Strengthening exercises that involve extension and flexion, such as leg lifts and knee-to-chest movements, are also important to balance, stability, and fluidity in the psoas, pelvis, hip flexors, and surrounding muscles.
Another great prevention technique? Checking in with yourself and evaluating your movement and sitting patterns.
“Our environment and the ways we move in it is antagonistic to a healthy psoas,” Van Lingen says. We encourage guarding, bracing, and engagement, often with a stiff and rigid spine—activating and training to isolate our muscles, when “we should be moving in a curved, organic manner that is fluid and rhythmic.”
Before labeling our hip flexor or lower back pain as the source of the problem, we might consider taking inventory of our whole body to determine the root. With 30 minutes of sleep and hiking in the middle of the night, I finished the event with 13 minutes to spare.
“As does the psoas, so does the rest of the body.”—Jill Miller
Given what I’ve learned about the “muscle of my soul,” I plan to incorporate these practices into my mobility routine in hopes that my psoas will stay happy when I take on 29029 in Whistler this summer.
Miller emphasizes the vital role of this muscle: “As does the psoas, so does the rest of the body.”
Because the psoas doesn’t discriminate between sitting, running, walking, lifting weights, or other types of activity, improving how we move and flex our body through the planes of motion can ease the tension in our psoas, bringing balance and harmony to our hips, pelvic floor, diaphragm, and spine.
Our editors independently select these products. Making a purchase through our links may earn Well+Good a commission.