If you’re looking to build a bigger, stronger butt, barbell hip thrusts are the move your workout routine just might be missing. This exercise is one of the best ways to grow your backside and injury-proof your lower body. Below, we share everything you need to know about this exercise, including hip thrust muscles worked, form tips, and our favorite variations.
Which muscles are worked in hip thrusts?
The main muscle worked during hip thrusts is your gluteus maximus—the biggest and strongest muscle in your body.
Your hamstrings, other glute muscles (gluteus medius and gluteus minimus), and adductor longus are also targeted to a lesser extent. This makes the barbell hip thrust an ideal exercise for training the back of your lower body.
How to do hip thrusts with perfect form every time

- Begin seated with your back against a bench. The bench should rest against the bottom of your shoulder blades.
- Position your feet so they are just outside your hips and knees.
- Place a barbell on your hips. You can put a foam pad or towel around the middle of the barbell to protect your hip bones.
- Initiate the rep by driving through your heels and lifting your hips off the ground. Squeeze your butt and drive up into the barbell.
- Look straight ahead and not up at the ceiling.
- Hold this position with fully extended hips for 1 to 2 seconds.
- Finish the rep by slowly lowering your hips back to the floor.
- Repeat.
What are the benefits of hip thrusts?
1. They build glute strength and muscle
One of the most notable hip thrust benefits is that the move can help you build a bigger, rounder behind. Placing load directly on your hips heavily targets your glute muscles. This helps them grow when paired with proper nutrition and a well-rounded lower-body workout program.
Even if you don’t care about what your butt looks like, everyone can benefit from having stronger glutes. Strong glutes help keep your knees and low back healthy. They let you lift more weight on other exercises like squats, deadlifts, and lunges.
2. They improve your athletic performance
If you’re looking to become more resilient and competitive on the track, field, trail, or court, hip thrusts can help by strengthening your glutes. Strong glutes play a key role in running, cutting, jumping, and other athletic moves. They can make you more powerful and explosive as well as reduce your risk of knee and lower back injuries.
3. They train your lower body without taxing your knees
Some people can’t target their glutes through squats and lunges due to knee injuries. The hip thrust is a more knee-friendly alternative that allows you to lift heavy without compromising your recovery.
How to make hip thrusts easier
1. Mini band hip thrust
Not ready to perform hip thrusts with a barbell? Try adding a mini band around your knees. This is a great way to add a bit of load while you learn the exercise.
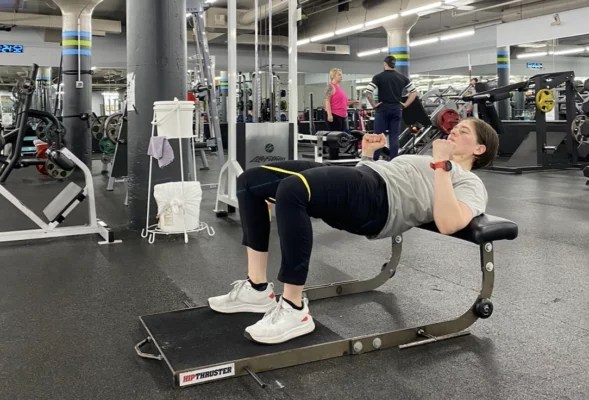
- Begin seated with your back against a bench. The bench should rest against the bottom of your shoulder blades.
- Position your feet so they are just outside your hips and knees.
- Place a mini band just above your knees.
- Initiate the rep by driving through your heels and lifting your hips off the ground. Squeeze your butt and your hips up.
- Look straight ahead and not up at the ceiling.
- Hold this position with fully extended hips for 1 to 2 seconds.
- Finish the rep by slowly lowering your hips back to the floor.
- Repeat.
2. Dumbbell hip thrust
You can still perform loaded hip thrusts if you don’t have access to barbells. Place a dumbbell on top of your hips and use your hands to keep it in place. You could also use a kettlebell, medicine ball, or sandbag.
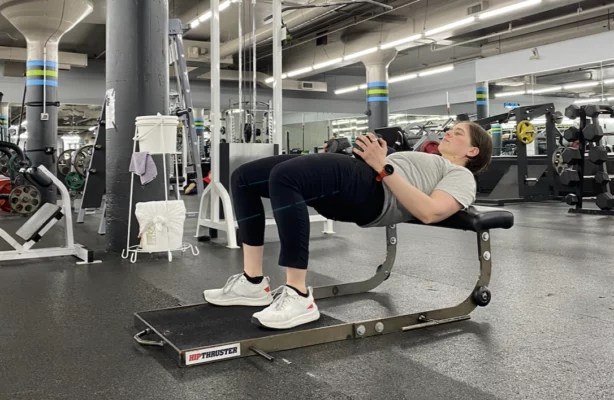
- Begin seated with your back against a bench. The bench should rest against the bottom of your shoulder blades.
- Position your feet so they are just outside your hips and knees.
- Place dumbbell horizontally on top of your hip joints. Hold each side of the dumbbell so it stays in place.
- Initiate the rep by driving through your heels and lifting your hips off the ground. Squeeze your butt and drive up into the dumbbell.
- Look straight ahead and not up at the ceiling.
- Hold this position with fully extended hips for 1 to 2 seconds.
- Finish the rep by slowly lowering your hips back to the floor.
- Repeat.
3. Glute bridge
The glute bridge is perfect for beginners or anyone who can’t do hip thrusts. These can be performed as a bodyweight warm-up drill or loaded with a barbell or other weights as part of a strength workout.
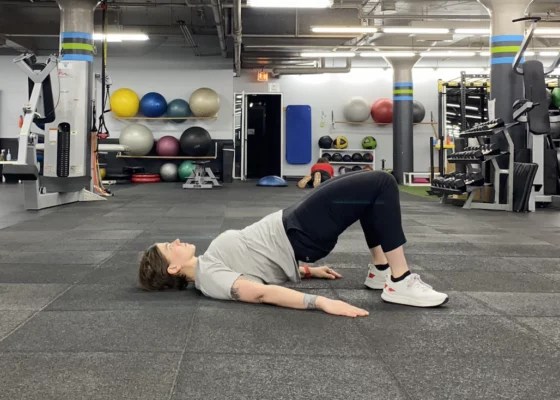
- Lie down on your back.
- Bend your knees and place your feet on the ground. Your feet should be hip-distance apart, and your arms should be slightly diagonal away from your body with your palms on the floor.
- Lift your hips until you have a straight line from your shoulders to your knees.
- Squeeze your glutes at the top.
- Release as you lower your hips back down.
- Repeat.
How to make hip thrusts harder
Looking to spice up your hip thrust training? Try these three challenging variations. Warning: These aren’t for the faint of heart!
1. Single-leg hip thrust
Single-leg hip thrusts are a fantastic exercise for building functional lower-body strength. Try it once you’re feeling confident on two legs.
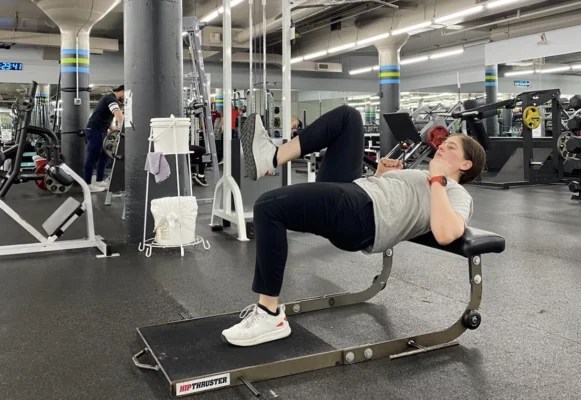
- Begin seated with your back against a bench. The bench should rest against the bottom of your shoulder blades.
- Position your feet so they are just outside your hips and knees.
- Lift one foot off the ground.
- Initiate the rep by driving through you the heel that’s on the ground and lifting your hips off the ground. Squeeze your butt and drive your hips up.
- Look straight ahead and not up at the ceiling.
- Hold this position with fully extended hips for 1 to 2 seconds.
- Finish the rep by slowly lowering your hips back to the floor.
- Repeat.
Tip: You may want to try this move without any added weight first. In time, you can consider adding extra load with a barbell or dumbbell.
2. Hip thrust with mini band hip abduction
You can use a mini band to challenge your gluteus medius and other hip abductors. These muscles are located on the sides of your hips and play an important role in knee health and athletic performance.
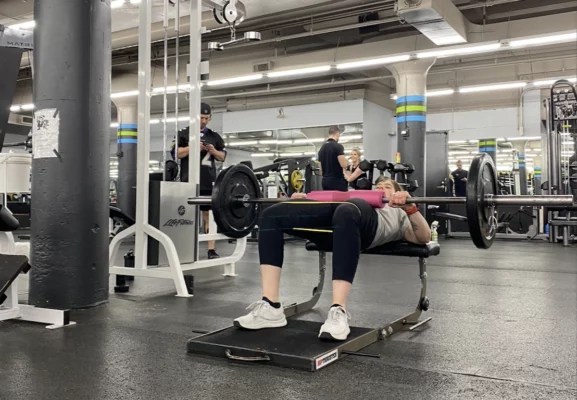
- Begin seated with your back against a bench. The bench should rest against the bottom of your shoulder blades.
- Position your feet so they are just outside your hips and knees.
- Place a mini band just above your knees and place a barbell on your hips. You can put a foam pad or towel around the middle of the barbell to protect your hip bones.
- Initiate the rep by driving through your heels and lifting your hips off the ground. Squeeze your butt and drive up into the barbell.
- Look straight ahead and not up at the ceiling.
- Hold this position with fully extended hips for 1 to 2 seconds.
- Finish the rep by slowly lowering your hips back to the floor.
- Perform 8 to 15 reps.
- Roll the barbell off your legs.
- Still sitting up, perform 15 to 20 mini band hip abductions where you drive your knees out hard against the band.
3. Pulse hip thrust
This variation dramatically increases your time under tension, which means your set goes on a lot longer.

- Begin seated with your back against a bench. The bench should rest against the bottom of your shoulder blades.
- Position your feet so they are just outside your hips and knees.
- Place a barbell on your hips. You can put a foam pad or towel around the middle of the barbell to protect your hip bones.
- Initiate the rep by driving through your heels and lifting your hips off the ground. Squeeze your butt and drive up into the barbell.
- Look straight ahead and not up at the ceiling.
- Perform 5 mini pulses where you lower your hips a few inches (not all the way to the floor) and then drive your hips back up.
- Finish the rep by slowly lowering your hips back to the floor.
- Repeat.
Tip: It’s best to do fewer reps of this move. Try 5 to 10 total reps.
Hip thrust vs. glute bridge: What’s the difference?
Hip thrusts and glute bridges are very similar. The biggest difference is that glute bridges are performed lying on the floor, while hip thrusts are performed sitting upright with your back against a bench.
Hip thrusts use a larger range of motion and stretch your glutes more than glute bridges. This means hip thrusts are harder and offer more potential gains than glute bridges.
Common mistakes people make when doing hip thrusts
1. Incorrect foot position
Selecting the wrong foot position can compromise your hip thrust glute gains.
Putting your feet too close to your body turns hip thrusts into a quad dominant exercise. If you place your feet too far away from you, your hamstrings take over.
Instead, place your feet so your knees form a 90-degree angle when you’re at the top of your hip thrust. Your feet should also be slightly outside your hips.
Everyone’s body is different. Experiment to find the foot position that lets you feel your glutes the most.
2. Sitting too low
Sitting too low, with the bar pushed into your upper back or traps, makes it harder to effectively use your glutes. It’s also uncomfortable and can cause you to slide down the bench during your set.
Instead, sit as high as possible. The bench should rest against the bottom of your shoulder blades toward the middle of your back.
If you’re using a bench that’s really tall, you might need to compromise and sit so that your butt doesn’t fully hit the ground in the middle of each rep.
3. Not locking out your hips at the top of the move
It’s crucial to fully lock out your hips the top of the exercise. That’s where your glutes are most engaged, so you’re leaving gains on the table if you fall short.
If you’re struggling with lock out, try adding a 2-second pause at the top of each rep. You may also need to lower the weight.
4. Hyperextending your lower back
The hip thrust is not a lower back exercise, and you don’t want to excessively arch your back at the top.
Two things help with this. First, stop driving the bar up once your hips are extended. Second, look straight ahead of you for the entire set. There should be a straight line running from the bottom of your ribs through your hips and knees.
5. Choosing the wrong weight
If you’re struggling to lock out, you might be going too heavy. Lower the weight for now and you’ll actually get more out of the exercise.
On the flip side, some people are scared to add weight. Your glutes are the biggest, strongest muscles in your body, and they need to be challenged with heavy loads in order to grow. Don’t be afraid to load up your hip thrusts once you’ve got your form down.
FAQ
1. How many sets and reps of hip thrusts should you do?
Hip thrusts are a versatile exercise, and you can use many different sets and rep schemes.
Here are a few that work well:
- 2 to 4 sets of 8 to 12 reps with a moderate load.
- 3 to 4 sets of 5 to 8 reps with a heavy load.
- 4 sets of 15, 10, 5, and 20+ reps. Add weight on each of the first 3 sets. Lower the weight on the final set and do as many reps as you can.
2. What weight should a beginner use for hip thrusts?
At first, you can start with an unloaded barbell to get your form down. If that feels too easy, load your barbell with 10-pound or 25-pound bumper plates on each side (65 or 95 pounds total). Bumper plates are round, rubber plates that usually come in 10-, 25-, and 45-pound increments. Add weight once you can easily do 12 reps with good form.
If your gym doesn’t have bumper plates, you’ll have to use regular metal plates. It’s best to wait until you’re strong enough to use the 45-pound metal plates because it’s awkward to set up hip thrusts using small plates.
3. How many days per week should you do hip thrusts?
You can make great progress doing hip thrusts once per week, so long as you also perform other lower body exercises like squats, deadlifts, and lunges.
If you want to perform hip thrusts more than once a week, it’s important to mix up your training methods and loads. You could do one day with low reps and heavy weight and then one day with moderate reps and moderate weight.
